My ZTNA Home Lab Series

My ZTNA Home Lab Series
My Journey to Zero Trust Network Access (ZTNA) with a Homelab Using Proxmox VE
As a cybersecurity enthusiast and homelab owner, I’ve always sought ways to integrate the latest security frameworks into my personal projects. One of the concepts that has gained massive traction in recent years is Zero Trust Network Access (ZTNA). The idea of “trust no one, verify everything” resonated with me as I managed my homelab, which runs on Proxmox VE as the hypervisor, mixing LXC containers and virtual machines (VMs). In this blog post, I’ll take you through my journey toward implementing ZTNA in my homelab environment, showcasing how these technologies fit together, the challenges I faced, and the ultimate benefits I’ve experienced.
Why ZTNA?
The cybersecurity landscape is constantly evolving, and traditional security models that rely on a strong perimeter are no longer enough. With increasing attacks targeting internal systems, I knew that securing access to my homelab required more than just a simple firewall or VPN. I needed a dynamic and adaptable approach, especially given the variety of workloads I run—from test servers to development environments.
Choosing Proxmox VE as My Hypervisor
For my homelab setup, I chose Proxmox VE as the hypervisor for a few key reasons:
- Flexibility: Proxmox allows me to run both LXC containers and full virtual machines (VMs), giving me the versatility to test a variety of services and architectures in isolated environments.
- Efficient Resource Management: The ability to mix VMs and lightweight LXC containers lets me allocate resources more efficiently, optimizing the performance of my homelab.
- Open Source: As an advocate for open-source solutions, Proxmox VE stood out for its active community and support for open-source virtualization technologies like QEMU and KVM.
This setup allowed me to build and replicate enterprise-like environments, which was essential for testing out ZTNA principles.
Designing a Zero Trust Network in My Homelab
With the core of my homelab in place, the next step was to design a network that adhered to Zero Trust principles. Here’s how I approached it:
- Segmentation and Isolation:
The first step was ensuring that each service or workload—whether running in a VM or an LXC container—was isolated from others unless explicitly permitted to communicate. Proxmox VE made it simple to create isolated networks using virtual bridges, which I used to segment different services based on their function or sensitivity. Each segment became its own “micro-perimeter,” with strict controls over what could flow in and out. - Identity-Based Access:
With ZTNA, the focus shifts from network-based security (i.e., relying on IP addresses) to identity-based security. I integrated tools that required users (myself included) to authenticate using multi-factor authentication (MFA) before gaining access to any resources. This ensured that even if I was accessing my homelab from different devices or locations, the system would verify my identity dynamically before granting access. - Contextual and Adaptive Access:
Each access request had to be evaluated in real-time, considering not just who was making the request, but also factors like location, device security posture, and time of day. For example, if I tried to access my homelab from an unrecognized device or outside my usual hours, additional layers of authentication would be required. This adaptive access approach allowed me to minimize the risk of unauthorized access, even if credentials were compromised. - Granular Control Over Workloads:
Running both VMs and containers allowed me to define very specific rules about what each environment could do. Containers could be spun up with limited access to network resources, while VMs running more critical workloads were placed behind stricter access controls. The flexibility of Proxmox VE made this granular control easy to manage and fine-tune.
Challenges Faced Along the Way
While the theory of ZTNA is straightforward, implementing it in a homelab setup had its own set of challenges:
- Managing Complexity:
As the number of services and workloads grew, so did the complexity of managing identities and access policies. Ensuring that each service had the right permissions required careful planning and regular auditing. - Performance vs. Security:
Implementing ZTNA meant adding multiple layers of security, including identity verification, contextual access decisions, and network segmentation. While these improved security, they also introduced performance overhead. I had to strike a balance between securing the network and maintaining the performance of my homelab. - Tooling and Integration:
Finding the right tools that could integrate with Proxmox VE and support ZTNA principles was key. I experimented with various open-source and commercial solutions for network monitoring, access management, and identity verification to ensure they worked harmoniously within the ecosystem I’d built.
Benefits of ZTNA in My Homelab
After overcoming these challenges, the benefits of implementing ZTNA in my homelab were clear:
- Stronger Security Posture:
My homelab is now much more resilient to potential breaches. Every access request is scrutinized, minimizing the risk of unauthorized access. - Greater Flexibility:
ZTNA allows me to access my homelab securely from anywhere without relying on traditional VPNs or perimeter-based security models. The flexibility to connect from various locations without compromising security is invaluable. - Improved Control:
The granular controls over individual workloads, made possible by mixing LXC containers and VMs, align perfectly with ZTNA’s “least privilege” principle. Each service has only the access it requires—nothing more, nothing less.
Network Diagram
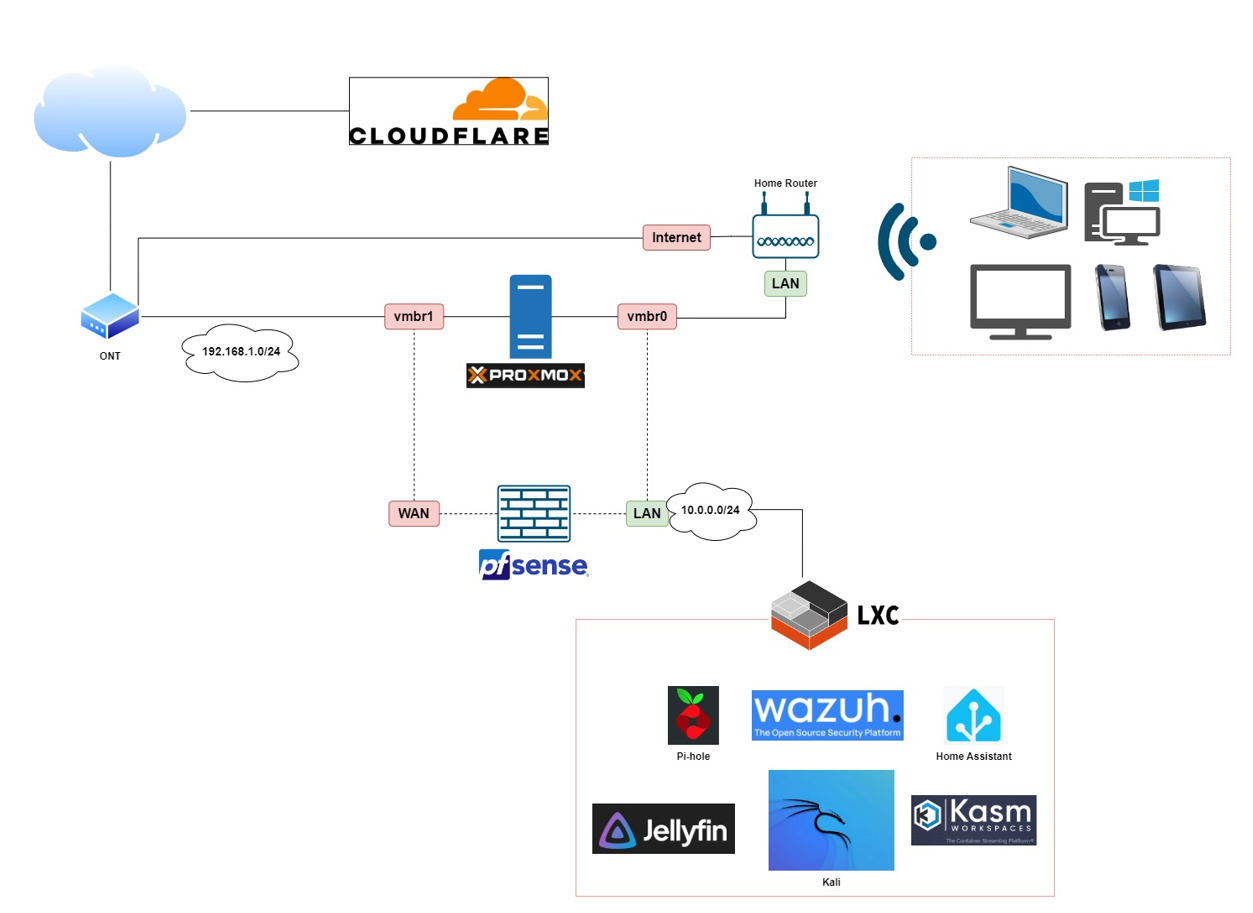
In this series on building a Zero Trust Network Access (ZTNA) framework in my homelab, I’ll be using a network diagram that emphasizes simplicity and scalability, leveraging entirely free and open-source technology. The goal is to show how easily accessible tools can be used to create a robust security model that any technical IT professional can replicate in their own environment—or even adapt for enterprise-level production if needed. From Proxmox VE for virtualization to open-source identity management, network monitoring, and access control solutions, the entire setup will demonstrate that cutting-edge security doesn’t have to come with a premium price tag. These technologies offer flexibility, community-driven support, and the ability to scale, making them ideal for both homelabs and businesses looking to implement a Zero Trust architecture without the burden of costly licenses.
I know it is NOT the very best connections that I did in my home lab but that will evolve eventually to a robust and high available infrastructure. You’lle see!
Final Thoughts
Implementing Zero Trust Network Access in my homelab using Proxmox VE and a mix of free, open-source technologies has been an insightful and rewarding experience. While the journey wasn’t without its challenges—open-source solutions can be complex, and getting everything to work together seamlessly required patience and persistence—there’s no hurdle too great for a determined IT professional, much like a Jedi overcoming obstacles through skill and focus. The end result is a fully functional, secure environment that mirrors enterprise-level Zero Trust principles. Open-source tools may sometimes feel cumbersome, but with dedication, every challenge is solvable, and the payoff is a flexible, cost-effective, and powerful system that’s ready for anything.